Experiencing the difficulties that come along with the shared hosting? When your WordPress site is becoming more popular and users are asking for more that you don’t have enough resources and the shared hosting environment can’t keep up anymore. Switching from a Shared Hosting environment to a Virtual Private Server (VPS) can be the most optimal way to guarantee better productivity, higher security, and total freedom to develop or modify your website as you like.
In this article, we’ll cover every single step from backing up your website that is previously on Shared Hosting and then transferring it to your new VPS along with optimizations that would be required by your site for enhanced performance. By following these steps, you’ll be able to migrate your WordPress site with confidence, knowing that your data is safe and your website will be ready to handle increased traffic and demands.
Editor’s Choice: What is a VPS and How It Helps? | Complete Guide 2024
Important Note
In this article we’ll consider Shared Hosting from Hostinger and VPS Server having Cloudpanel.io installed. Although Process is same for almost every hosting provider but for this post we’ll be covering Hostinger. Feel free to contact in comment section if you are stuck with any other providers.
Step 1: Backup Your WordPress Website:
Before starting the migration process make sure to create comprehensive backup of your existing WordPress site. This includes all of your data, files and configurations so that it can be restored if anything goes wrong during the migration. Here’s how you can do it:
Method#1: Using Hostinger HPanel
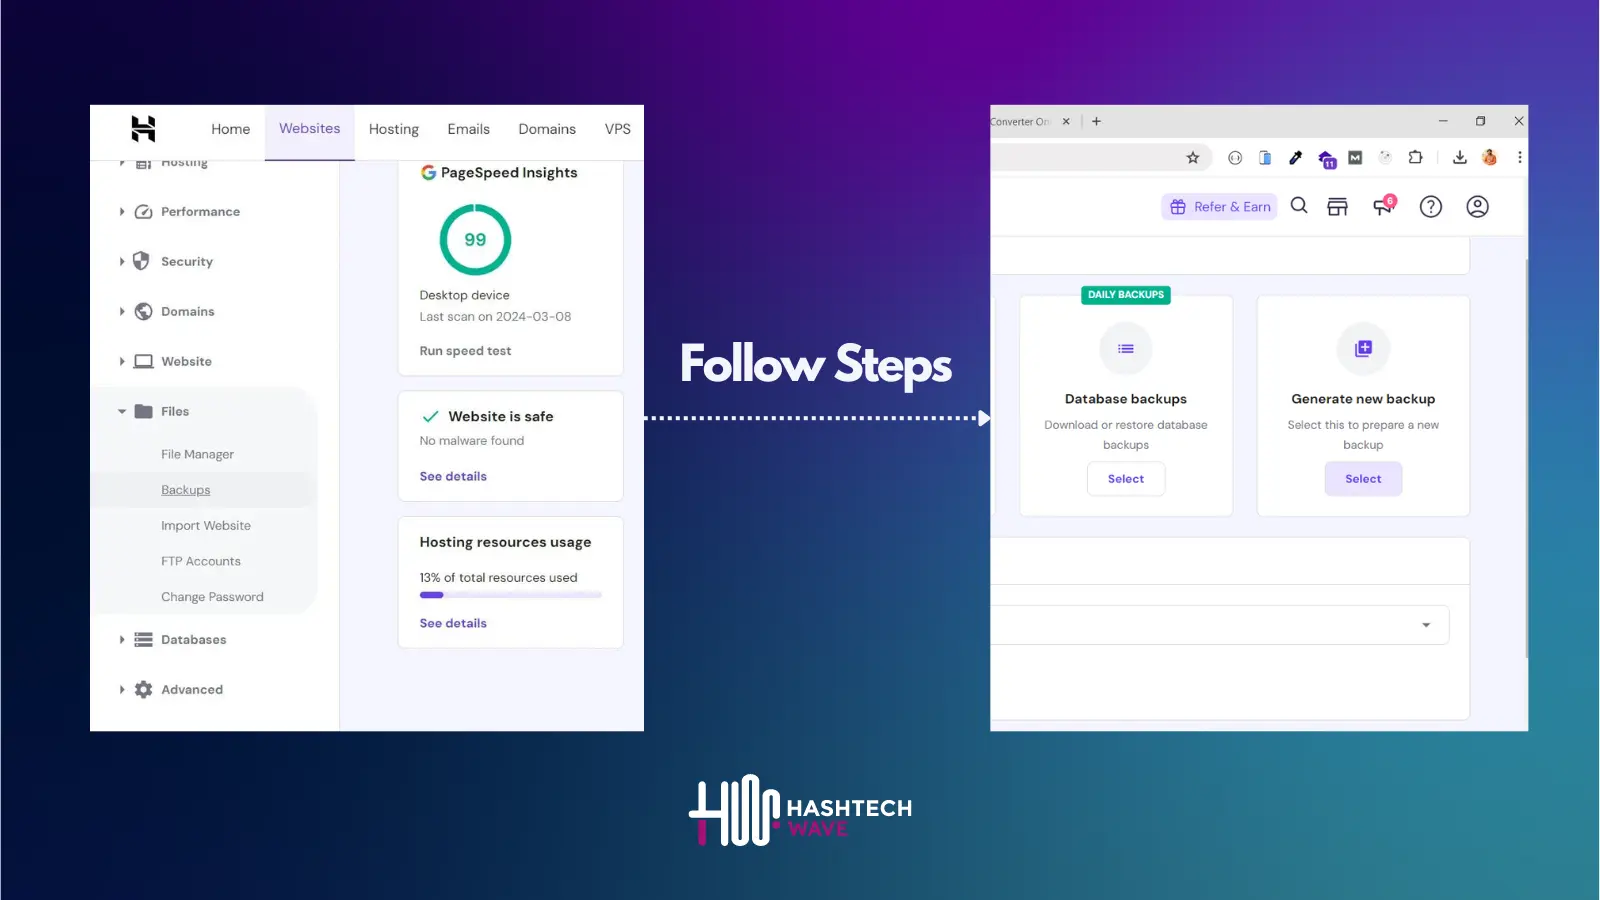
1.2. Backup Your WordPress Database
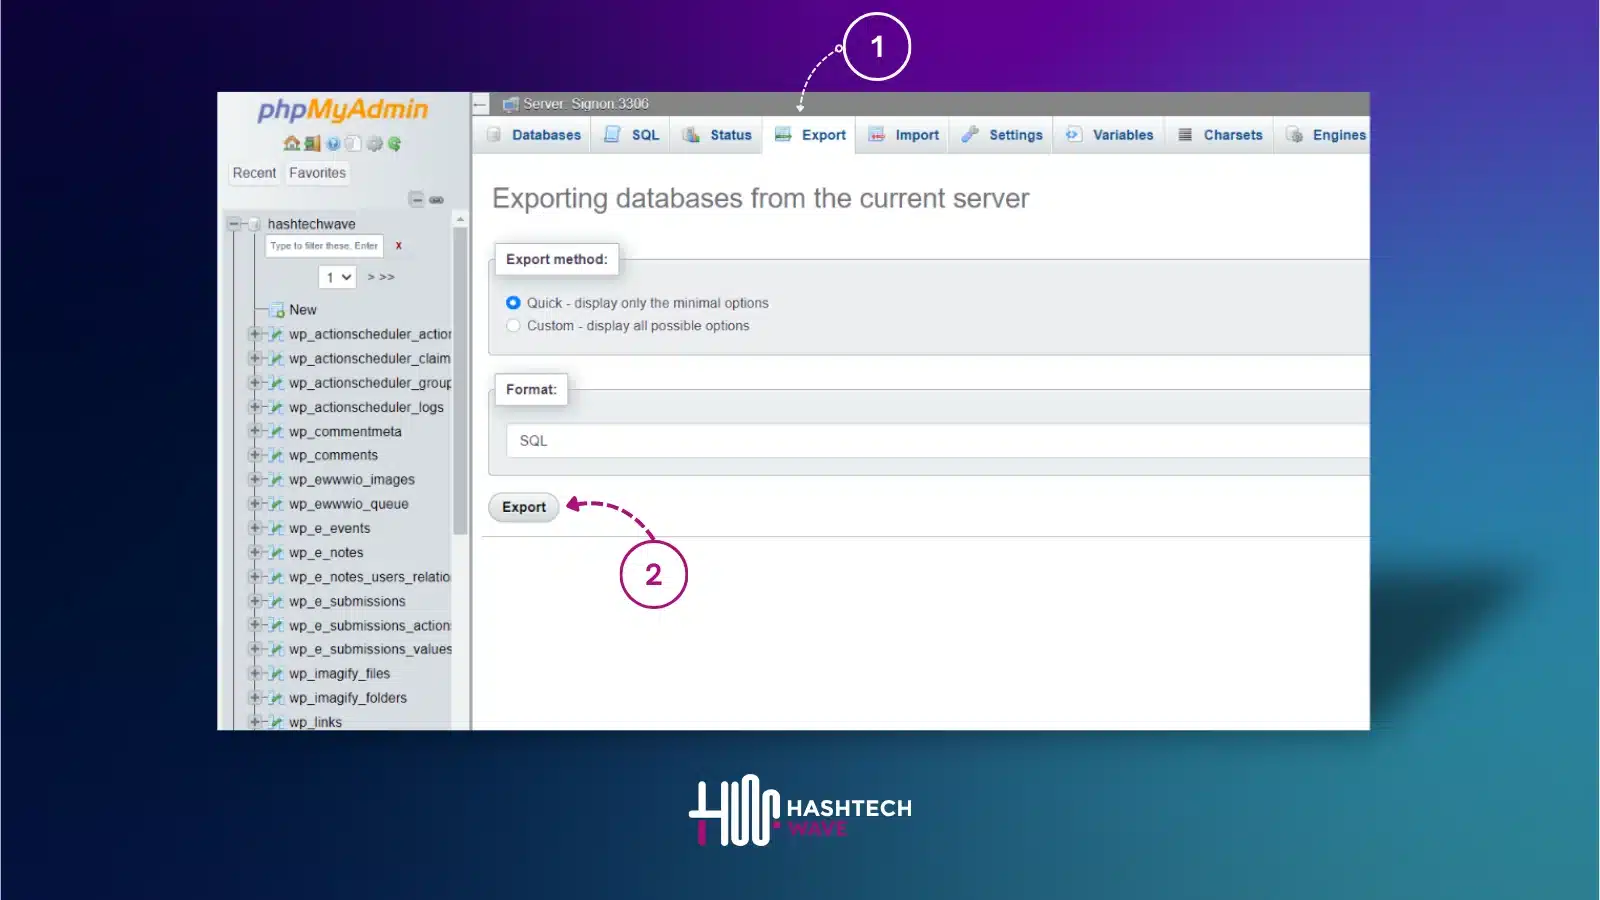
- Access phpMyAdmin:
- In hPanel, go to Databases > phpMyAdmin.
- Select Your Database:
- From the left-hand side, click on the database associated with your WordPress site.
- Export the Database:
- Click on the Export tab at the top.
- Choose the Quick export method and make sure the format is set to SQL.
- Click Go to download the SQL file to your local computer.
Method#2: Use a WordPress Backup Plugin (Optional)
second method is little easier but little costly, using a WordPress backup plugin can be a game changer. These plugins not only simplify the backup process but they also provide additional features that can save you time and headaches. Let’s explore two of the most popular backup plugins, UpdraftPlus and All-in-One WP Migration, and see how they can help you effortlessly back up your site.
Updraft Plus
UpdraftPlus, a name that stands in the Backup Plugins Hall of Fame and one of the most trusted backup plugins currently available. It uses a user-friendly interface and offers a number of advanced and user-friendly features which make your WordPress site backup efficient and comfortable.
- Install and Activate UpdraftPlus
- Head over to your WordPress dashboard, navigate to Plugins > Add New, and search for “UpdraftPlus”.
- Click Install Now and then Activate
- Create Your Backup
- Go to Settings > UpdraftPlus Backups
- Click the Backup Now button
- A pop-up window will appear. Ensure both Include your database in the backup and Include your files in the backup are checked, then click Backup Now
- Download Your Backup
- Once the backup is complete, you can find it listed under the Existing Backups tab
- Click on each backup component (database, plugins, themes, uploads, and others) to download them to your local computer
Step 2: Adding WordPress Website to CloudPanel
Congratulations! Now that your WordPress website is safely backed up, nothing can hinder you from finally configuring the Hostinger VPS set up with CloudPanel. By this action, you will be able to allocate hosting for your WordPress site thus you will be able to install CloudPanel and make it a repository.
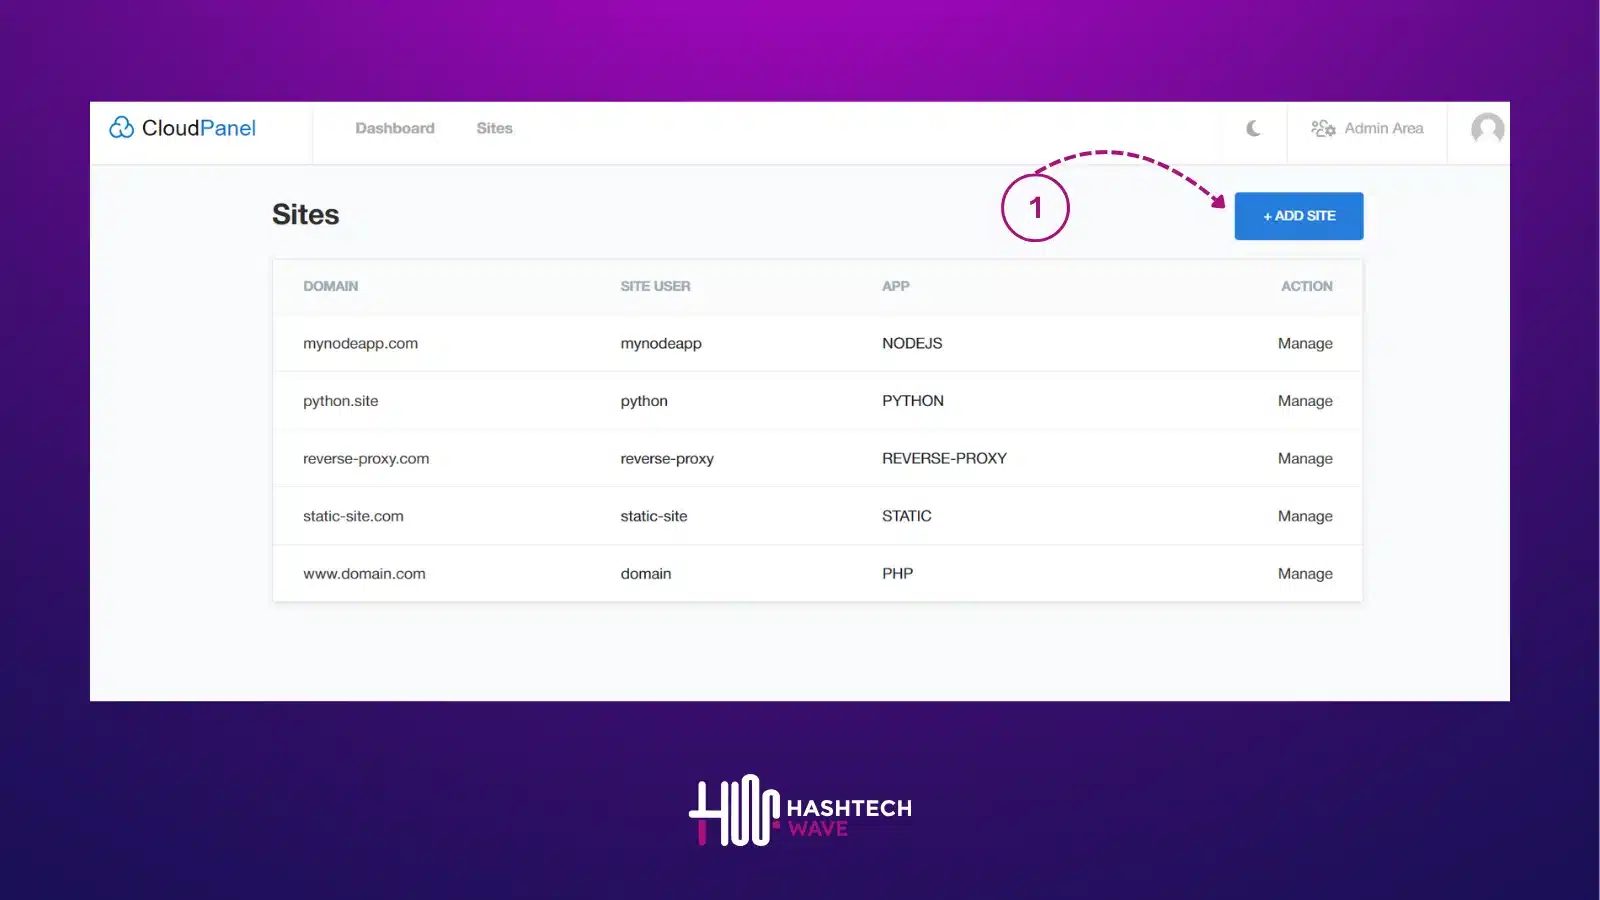
- Create a New Site:
- In CloudPanel, go to the Sites section and click Add Site.
- Fill in the required details, including your domain name, and select WordPress as the application.
- Set Up Your Domain
- Ensure your domain name is pointed to your VPS IP address. You can do this by updating the DNS settings in your domain registrar’s control panel.
- In CloudPanel, configure the domain settings for your new site.
Important Note
Cloudpanel.io Have no integrated support of DNS Settings, so can use Cloudflare or Google Cloud. Here is Guide of How can you add your site to Cloudflare
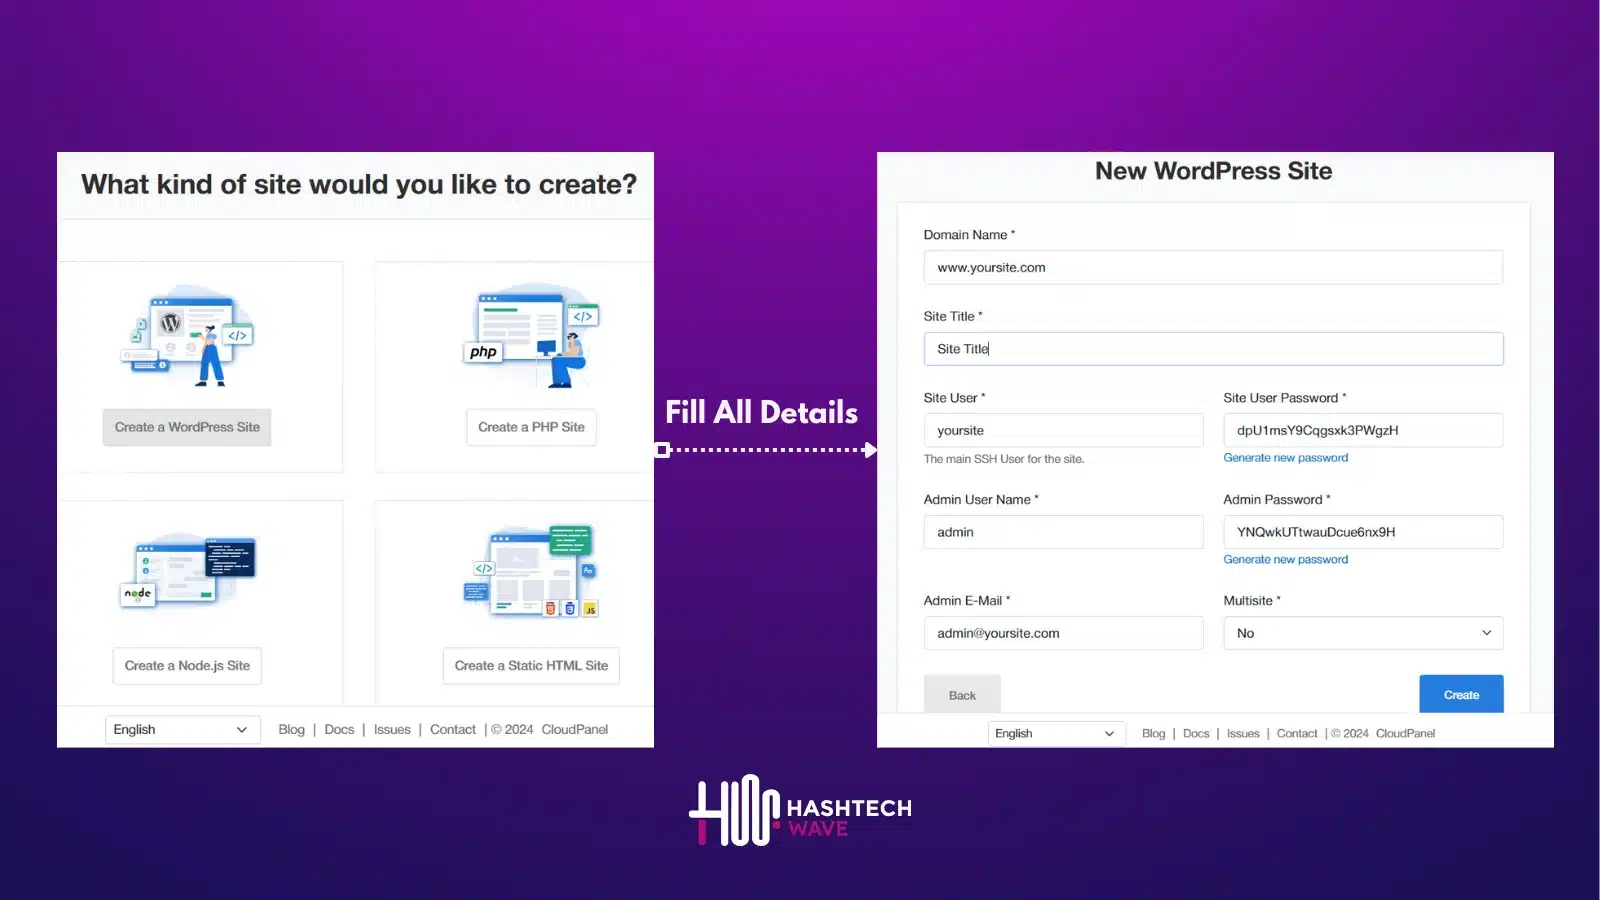
- Install and Configure WordPress
- CloudPanel will handle the installation of WordPress automatically when you create the site. When installation is completed then you will see a confirmation message with the WordPress admin URL and other server details including IP Address and Database credentials so copy them in sticky notes.
- Open File Manager of your site and Delete all existing files and upload either zip file of your backup including files of wordpress (Directly) or use FTP method to upload Your Backup Zip file. Note: Don’t Transfer files without zip as this will take too long to upload and may miss files which can cause waste of time and resources.
- Extract Files in that directory, which is pointed towards your domain as shown in figure Root Directory is /home/mynodeapp/htdocs/mynodeapp.com

- After Extraction, open up wp-config.php in Root Directory and you have to change according to details that your saved eariler on sticky note after installation of WordPress on your CloudPanel
// ** Database settings - You can get this info from your web host ** //
/** The name of the database for WordPress */
define( 'DB_NAME', 'YOUR_DB_NAME' );
/** Database username */
define( 'DB_USER', 'YOUR_DB_USER' );
/** Database password */
define( 'DB_PASSWORD', 'YOUR_DB_USER_PASSWORD' );
/** Database charset to use in creating database tables. */
define( 'DB_CHARSET', 'utf8' );
Step 3: Importing Database to PHPmyAdmin
Now we are getting close to our success for that we have to manually import our Backed Up MySQL Database to PHPmyAdmin, so follow along and you will import without any issue:
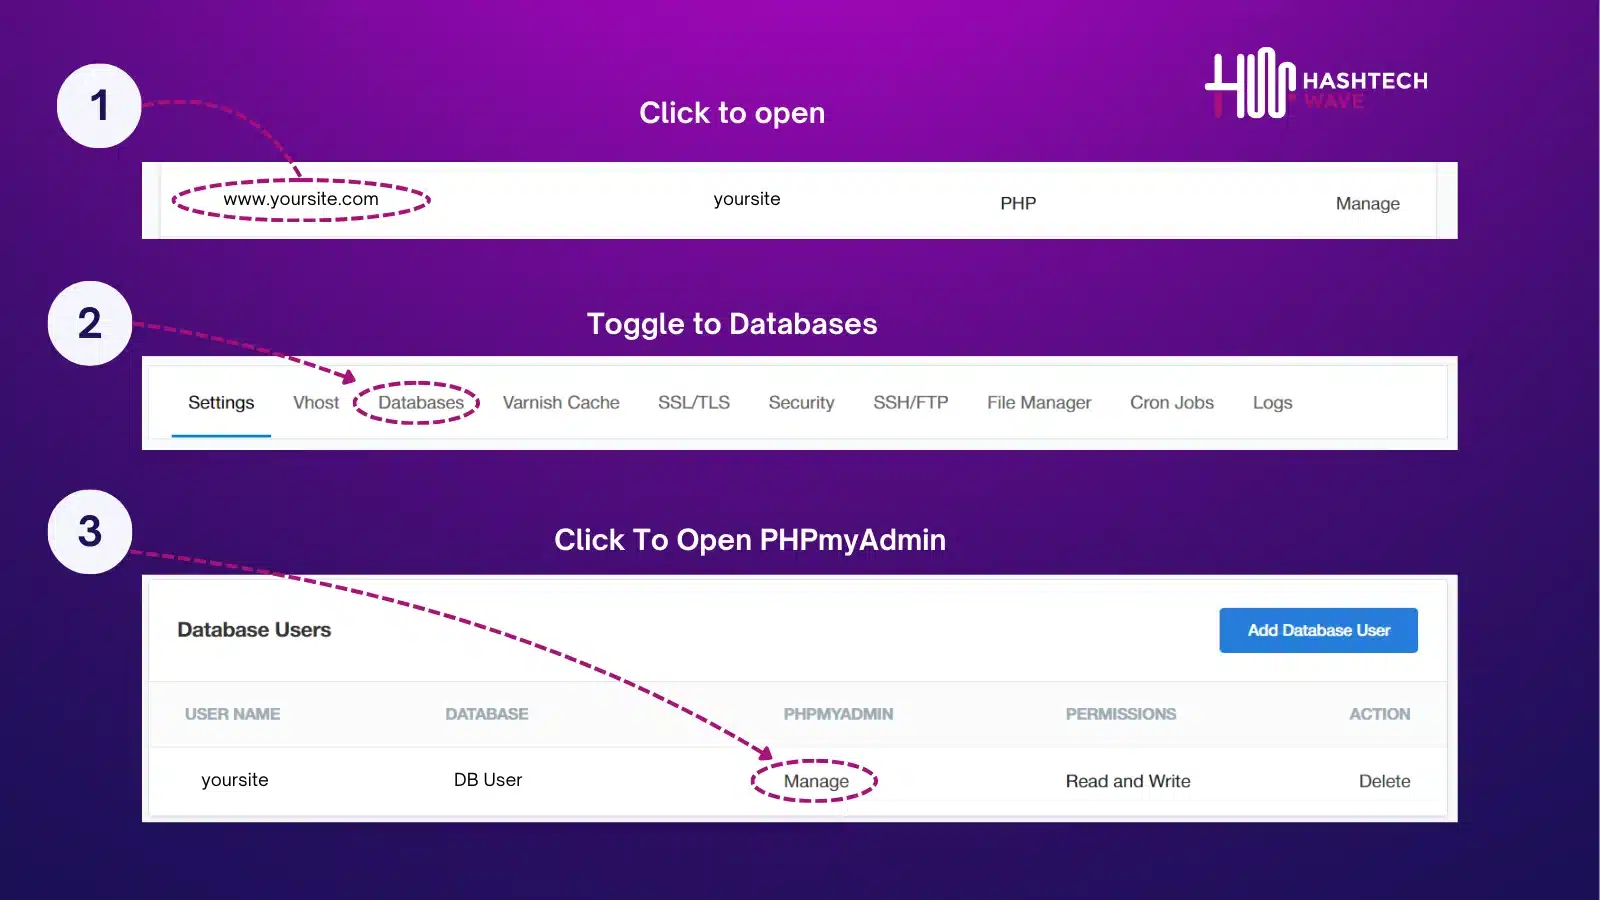
- On phpMyAdmin Dashboard, there you will see name of your Database so, firstly open up your database.
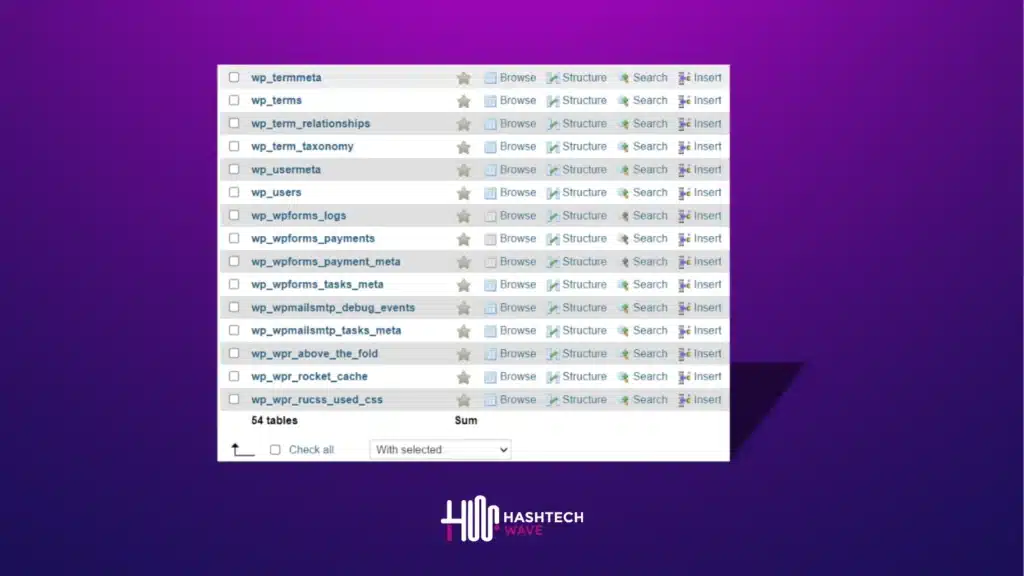
- There will be numourous tables created earlier, select all of them and using below drop down actions to select DROP. Remove all tables until your database get’s fully emptied.
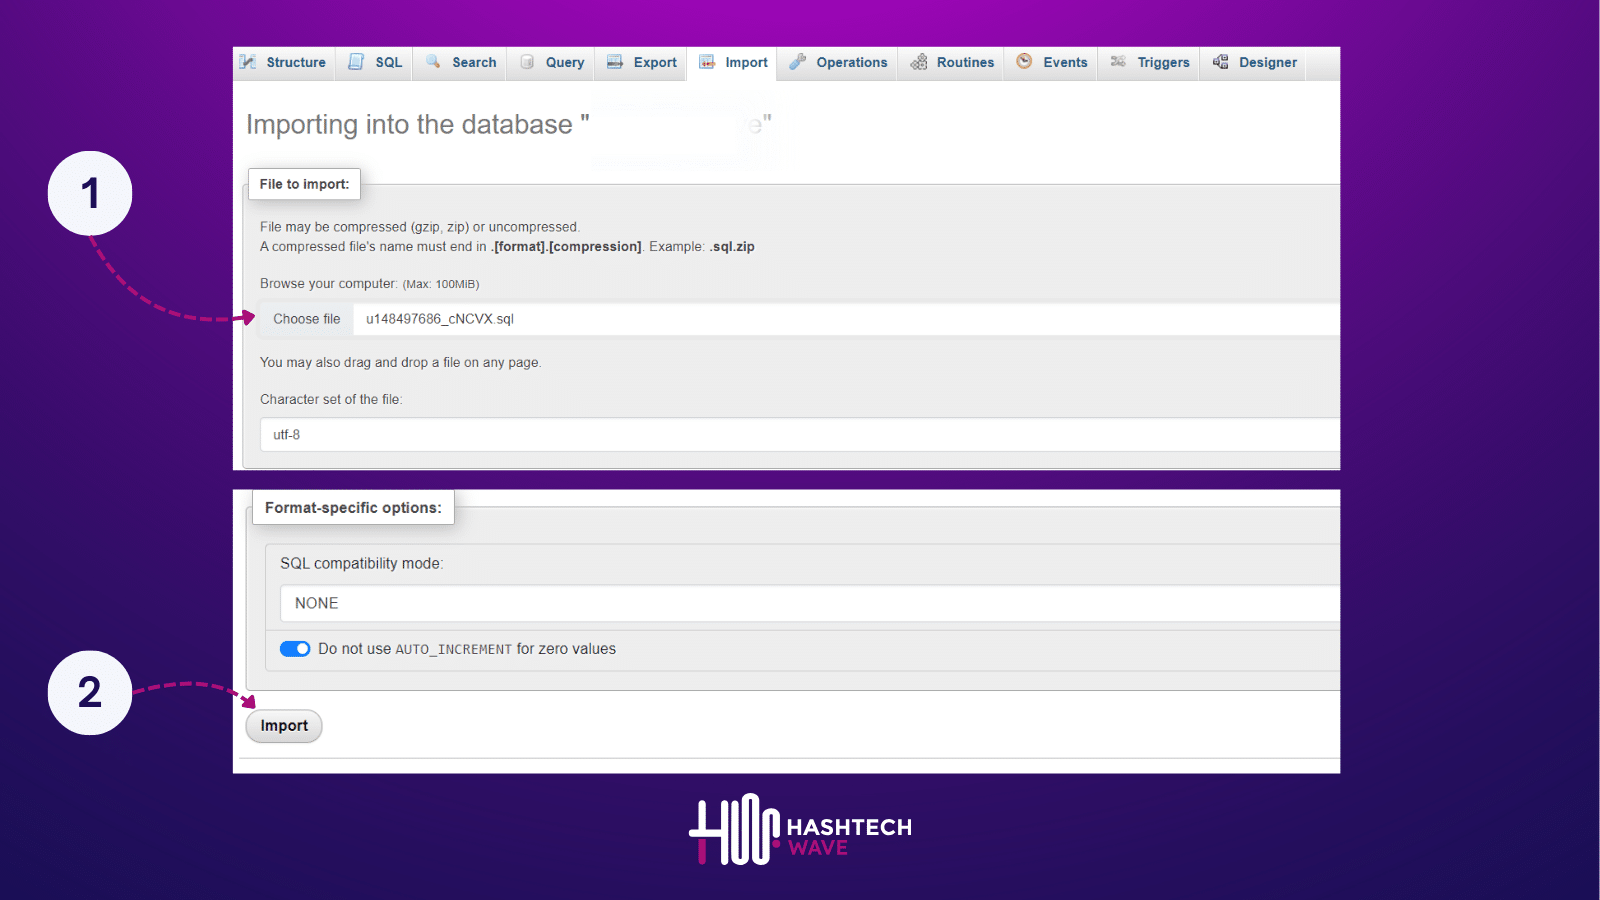
- Next step is to import your backed up mySQL file using top menu of phpMyAdmin. Upload your file and press Import.
Step 4: Installing SSL Certificate
If you are one this step then Congratulations! You are almost done. After importing your wordpress site to VPS hosting, we must have SSL (Secure Sockets Layer) that uses encryption protocol which then secures data communication between servers and browsers without any third party interception.
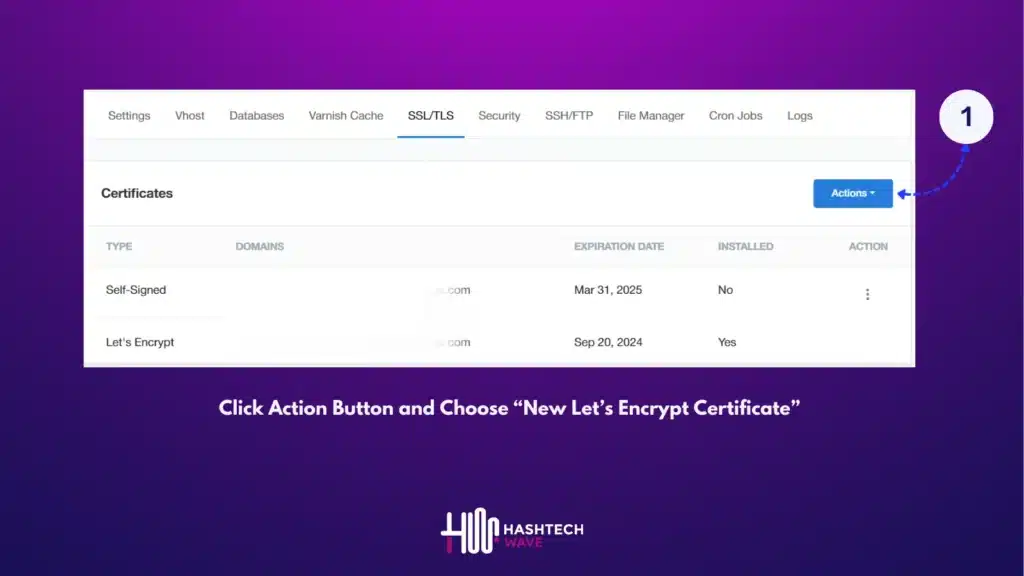
Here how you can Install SSL on your website in Cloudpanel:
- Navigate to Cloudpanel Sites panel and open up your website by clicking on it.
- There will be some options in menu bar, select SSL/TLS
Fix: Too many redirects (After migration Apache to Nginx)
Mostly after migration from Apache Web Server to Nginx, too many people have to face Redirect issues which are too much annoying although process of transfer was perfectly fine. Due to this you are unable to connect to wp-admin using your credentials. Don’t worry Hashtechwave is here to rescue you, Firsly see the reason of this issue and it’s quick fix:
Reason of Redirection (Issue):
In Apache web servers there configurations by default works with both www and non-www domains, but in NGINX you have to configure VHOST accordingly to work with both domains and also for http and https protocols. Without affecting original VHOST we can fix this issue by tweaking MySQL database.
- Open phpMyAdmin as demonstrated above.
- Select your Database and find table named “wp-options“.
- At the top of Table in option_name column, find siteurl and change its option_value
Value of siteurl should be changed from https://yoursite.com to https://www.yoursite.com
Conclusion:
Moving your WordPress website from Hostinger shared hosting to Hostinger VPS using CloudPanel is an important thing that you need to do to improve the performance, security, and scalability of your website. A lot of the guide’s readers have taken advantage of this step-by-step approach, progressing from making safe backups and setting up your VPS to getting rid of such flaws as the wrong redirection.
With your site now on a strong VPS, you can enjoy less load time, better control and the increased capacity to serve traffic. To keep your website in good shape and safe you need to do backups regularly and implement measures to enhance security.
Thanks for the follow-up. We believe this guide has given you confidence not only to administer your WordPress hosting on VPS but also to understand it. If you are facing troubles in relation to Web Hosting, Web Server, and their managements, you can get in touch with us and our field-smart team can give you almost professional assistance to fix your online presence. Happy Hosting!
Bonus: Setting Up Your Own Mail Server on VPS Hosting
Congratulations on successfully migrating your WordPress site to VPS hosting! Now, let’s take things up a notch. What about creating your mail server so you are in total control and have more privacy over your email? We put together a step-by-step guide that will help you do so.
Ultimate Guide to Setup Mailserver on CloudPanel Ubuntu 2024
In this guide you will get to know:


